
How to Set Up Universal Commerce Protocol on WordPress?
Key Takeaways
- Universal Commerce Protocol lets AI agents discover products and manage checkout.
- A WordPress store needs WooCommerce, clean product data, and secure API access.
- You can use a community plugin, a hosted service, or a custom UCP adapter.
- Your public UCP profile must appear at
/.well-known/ucp. - A plugin alone does not guarantee approval for checkout in Google Search or Gemini.
To set up Universal Commerce Protocol on WordPress, start with a working WooCommerce store. Next, prepare your product feed, publish a UCP profile, connect checkout endpoints, configure payments, and test the full order flow.
Universal Commerce Protocol, or UCP, is an open commerce standard introduced by Google on January 11, 2026. It gives AI agents a common way to discover products, create checkout sessions, complete purchases, and follow order updates.
UCP is not a normal WordPress feature. You need a WooCommerce integration, a third-party service, or a custom-built adapter. You also need Google approval before your store can offer direct buying through supported Google AI surfaces.
What Is Universal Commerce Protocol?
Universal Commerce Protocol is a shared language for AI-powered shopping. It connects AI agents, online stores, payment providers, and customer accounts without requiring a separate integration for every platform.
For example, a shopper could ask an AI assistant to find a product under a set price. The agent could check your catalog, confirm stock, calculate shipping, and start checkout through UCP.
The store still controls the order. You remain the merchant of record and keep responsibility for payments, taxes, shipping, returns, customer service, and legal compliance.
How UCP Works With WordPress and WooCommerce?
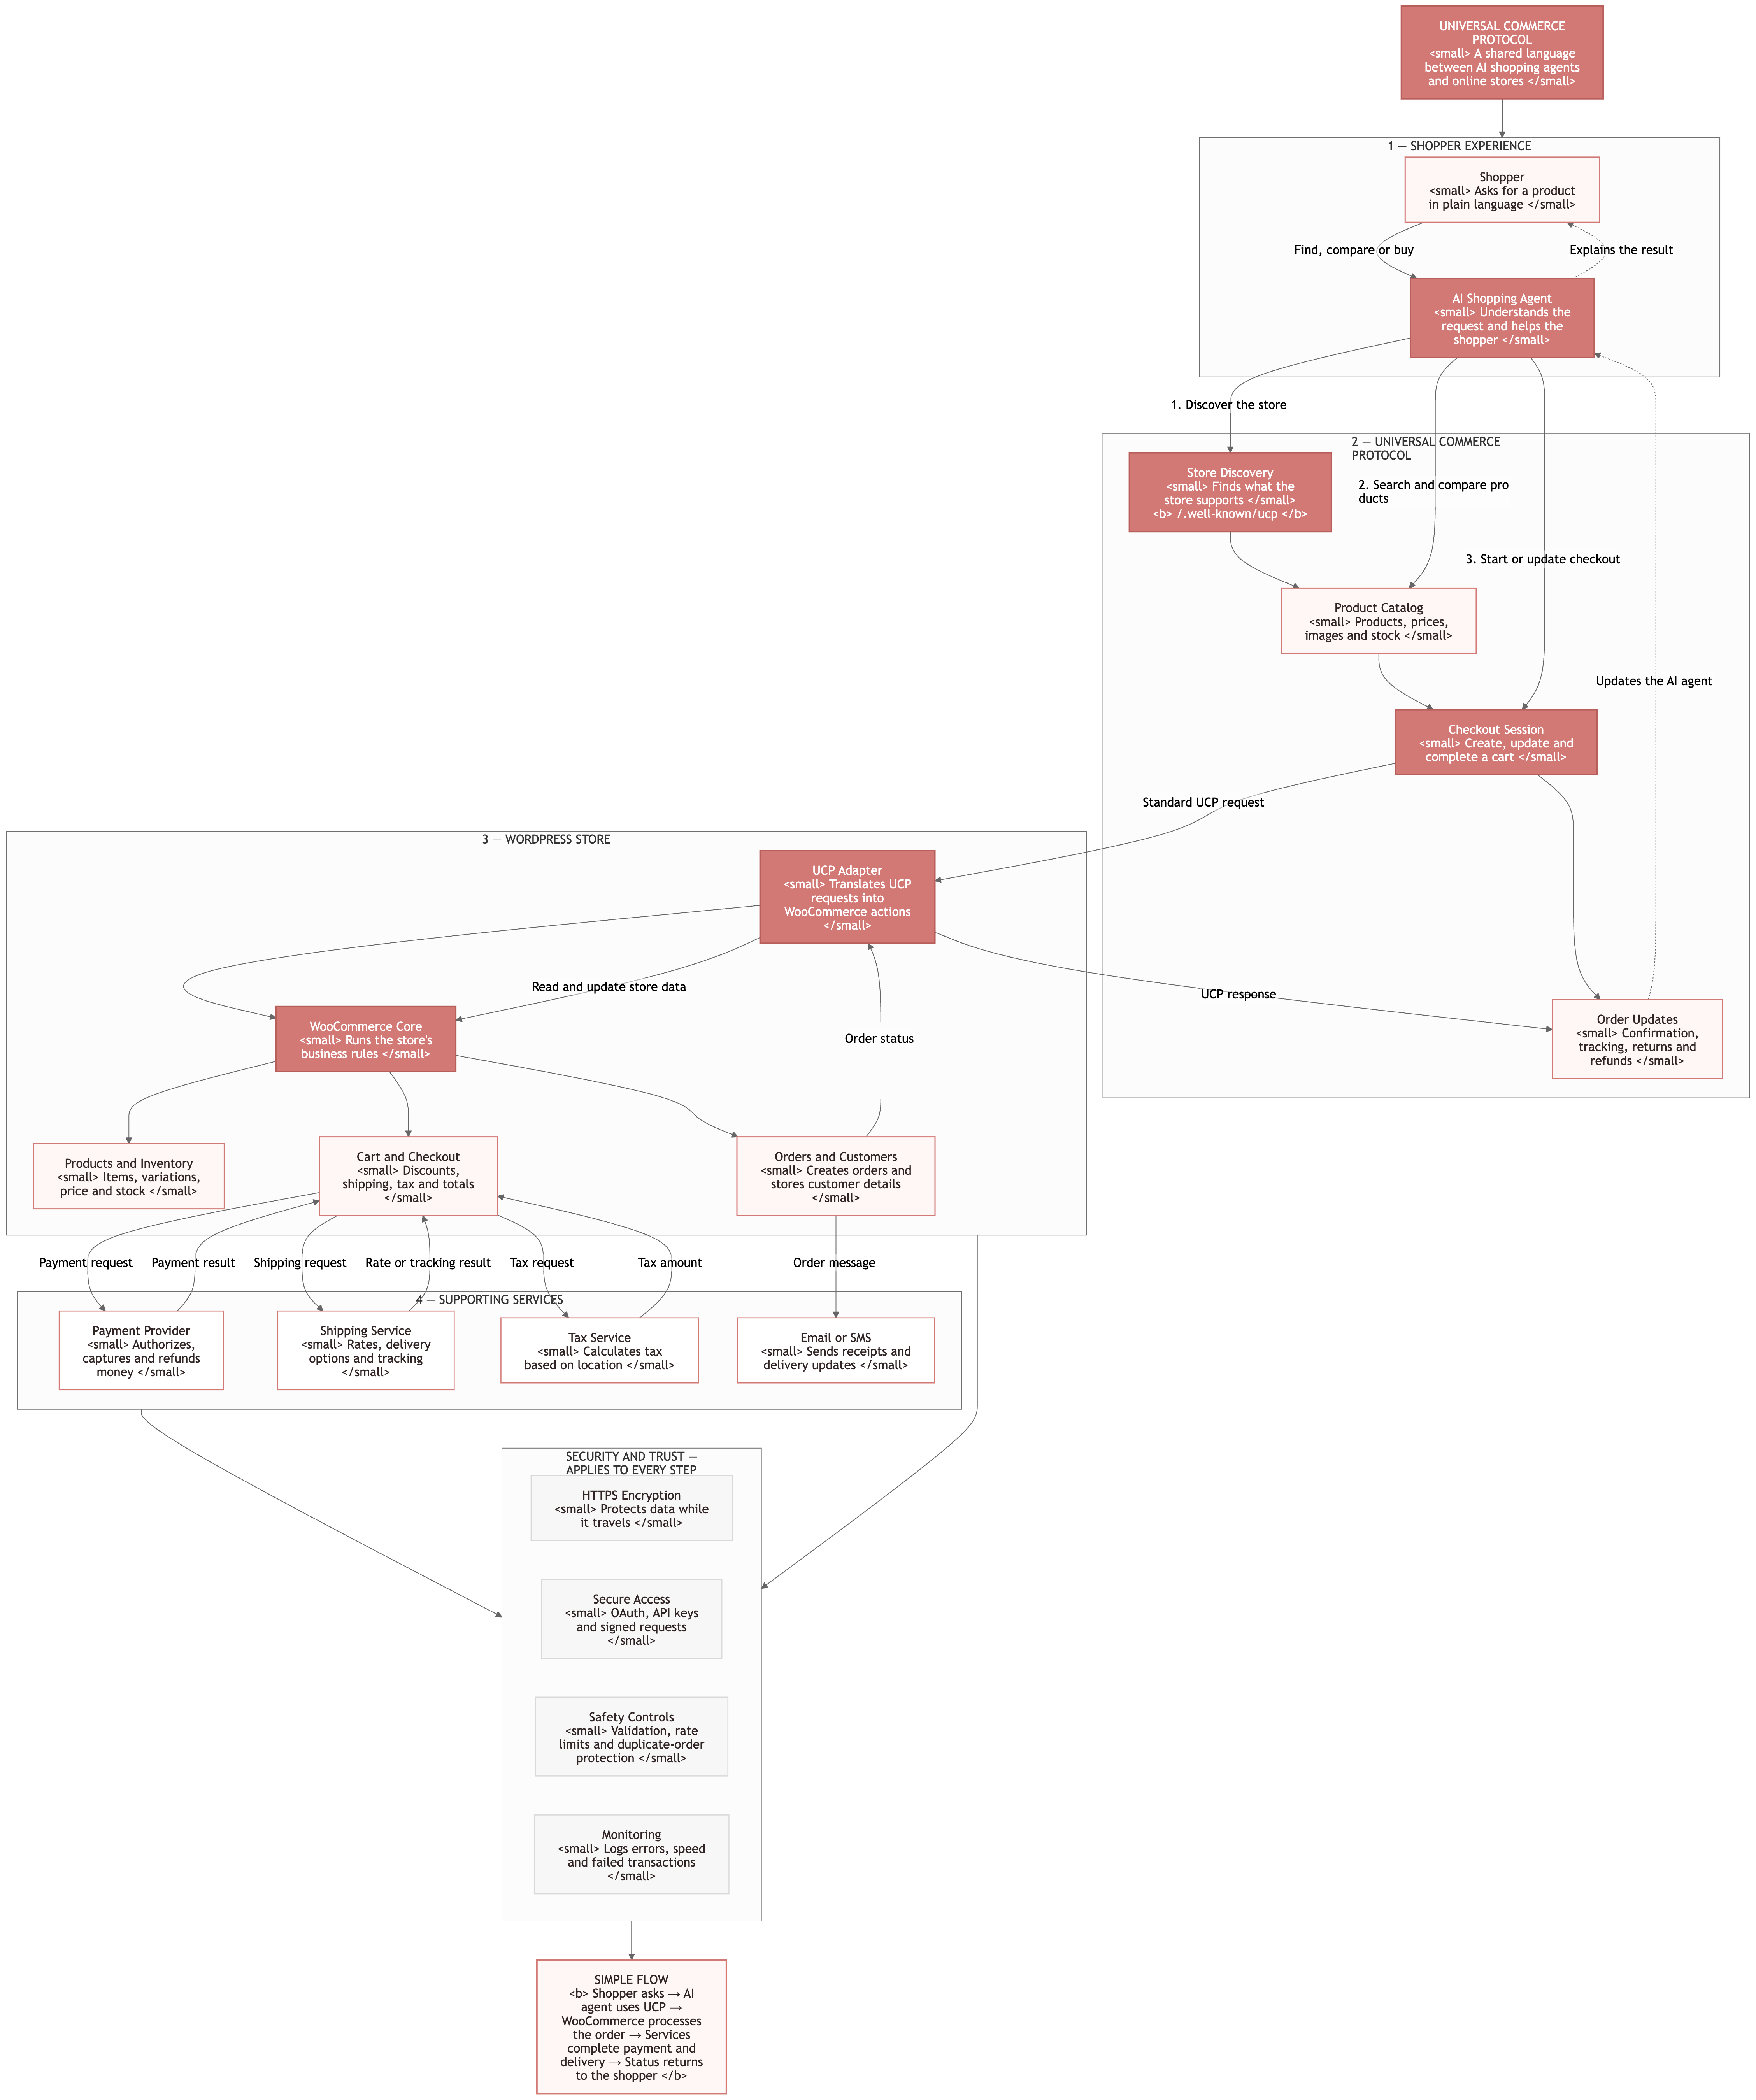
WordPress manages your website. WooCommerce manages the products, carts, payments, and orders. A UCP adapter sits between WooCommerce and the AI agent.
The adapter normally handles five jobs:
- It publishes your store’s UCP capabilities.
- It converts WooCommerce product data into UCP data.
- It creates and updates checkout sessions.
- It sends completed orders to WooCommerce.
- It reports order and fulfillment changes.
The normal WooCommerce installation does not publish a UCP profile by itself. Therefore, you need an extra plugin, hosted bridge, or custom API layer.
UCP Setup Options for WordPress
There are three main ways to add Universal Commerce Protocol to a WordPress website.
| Setup option | Best for | Main benefit | Main concern |
|---|---|---|---|
| Community WordPress plugin | Small stores and testing | Fast setup | Early-stage code and limited support |
| Hosted UCP service | Stores without an API team | Managed connection | External access to store credentials |
| Custom WooCommerce adapter | Large or complex stores | Full control | Higher development cost |
A community plugin is the easiest way to test UCP. However, store owners should review the plugin’s code, privacy terms, update history, and support record before using it for live orders.
A custom adapter is safer for stores with complex taxes, subscriptions, product bundles, multiple warehouses, or custom payment rules.
Current UCP Status for WordPress Stores
UCP is still a new standard. Google launched it in January 2026 and has continued to update its features and technical guides.
Google’s native checkout guide describes three core REST actions:
- Create a checkout session.
- Update a checkout session.
- Complete a checkout session.
Google expects these checkout endpoints to maintain at least 95% availability. Its published 95th-percentile latency targets are four seconds for session creation, five seconds for updates, and ten seconds for completion.
Community adoption on WordPress is still small. As of July 2026, one UCP plugin listed on WordPress.org showed more than 20 active installations and no submitted reviews. This does not make the plugin unsafe, but it shows that WordPress UCP tools are still at an early stage.
Step 1: Check Your WordPress Store Requirements
First, confirm that your website is a real WooCommerce store. A normal WordPress blog cannot process UCP checkout requests without a commerce system.
For one community UCP plugin, the listed minimum requirements are:
- WordPress 5.8 or newer
- WooCommerce 5.0 or newer
- PHP 7.4 or newer
- Pretty permalinks enabled
- A valid HTTPS certificate
These are plugin requirements, not universal UCP requirements. Your chosen tool may require newer software.
You should also have working product, cart, checkout, payment, shipping, tax, email, and refund systems before adding UCP.
Step 2: Create a Staging Website
Do not begin on your live store.
Create a staging copy of your website. Then back up the WordPress database, media files, themes, plugins, and server settings.
Your staging site should use the same:
- WooCommerce version
- Payment plugins
- Shipping extensions
- Tax settings
- Product types
- Checkout rules
- Security tools
This helps you find conflicts before real customer or payment data is involved.
Step 3: Clean Your WooCommerce Product Data
AI agents depend on structured product data. Missing or conflicting details can create wrong prices, unavailable items, or failed checkout sessions.
Review these fields for every product:
- Product title
- Description
- Regular and sale price
- Stock status
- SKU
- Brand
- Global product identifier
- Product images
- Size and color variations
- Shipping weight
- Shipping dimensions
- Tax class
- Return conditions
Each variation must have a clear identifier. For example, a small blue shirt and a large blue shirt should not use the same product ID.
The product ID sent to Google Merchant Center must also match the ID expected by your UCP checkout API. If the IDs differ, you need an accurate mapping.
Step 4: Connect WooCommerce to Google Merchant Center
Google Merchant Center supplies product information for UCP experiences on Google.
You can connect WooCommerce through the Google for WooCommerce extension or another approved product-feed tool. After the connection, check that your products appear correctly in Merchant Center.
Your account must be in good standing. Products must also be approved for free listings before they can become eligible for Google’s UCP checkout experience.
Google requires several business details, including:
- Return policy
- Return window
- Return costs
- Customer support details
- Shipping information
- Product availability
- Product identifiers
- Required consumer warnings
You must provide at least one customer support method. This can be a support webpage, email address, or phone number.
Step 5: Mark Products as Eligible for Agentic Checkout
Google uses product-feed data to decide which items can appear in its native commerce experience.
The native_commerce product attribute controls checkout eligibility. Products without an eligible value may still appear in product results, but they will not qualify for direct UCP checkout.
You may also need to provide:
- Consumer safety warnings
- Legal disclaimers
- Proposition 65 notices
- A merchant item ID
- Product-level return information
Do not mark a product as eligible until your API can calculate its final price, tax, shipping, stock, and fulfillment details correctly.
Step 6: Choose and Install a UCP Plugin
For a basic test, you can use a UCP plugin from the WordPress.org directory.
One available option uses the name “Universal Commerce Protocol (UCP) for WooCommerce.” Its installation steps are:
- Open your WordPress dashboard.
- Go to Plugins > Add New.
- Search for UCP Ready.
- Select Install Now.
- Activate the plugin.
- Open Settings > UCP & GEO Dashboard.
- Review the readiness checklist.
- Configure the available catalog and checkout options.
The plugin states that it creates an API key and registers a discovery endpoint after activation.
Before using any UCP plugin on a live store, check:
- Who maintains the plugin
- How often it receives updates
- Whether its source code is public
- Which external services it contacts
- What store data it sends
- How it stores API credentials
- Whether it supports variable products
- Whether it supports refunds and coupons
- Whether it works with HPOS
- Whether it matches the latest UCP specification
Avoid installing several UCP plugins at the same time. They may register the same routes and cause API conflicts.
Step 7: Publish the UCP Profile
Every UCP-enabled store needs a public business profile. Google expects this JSON document at:
https://example.com/.well-known/ucp
Replace example.com with your store domain.
The UCP profile tells an agent:
- Which UCP version your store supports
- Which commerce capabilities are available
- Where your API endpoints are located
- Which payment handlers you support
- Which public keys verify signed messages
- Whether checkout, discounts, fulfillment, and orders are supported
The profile must be public. It must not require a login or API key.
Test it by opening the address in a private browser window. You can also run:
curl -i https://example.com/.well-known/ucp
The response should return a successful status and valid JSON. It should not return a WordPress 404 page, HTML login screen, firewall challenge, or cached error.
Step 8: Fix WordPress Routing and Cache Problems
The /.well-known/ucp route may fail even when the plugin is active.
Common causes include:
- Incorrect permalink settings
- Server rewrite rules
- Security plugin restrictions
- CDN caching
- Web application firewall rules
- Forced login settings
- Maintenance mode
- Redirect plugins
Open Settings > Permalinks and save the settings once. This refreshes WordPress rewrite rules.
Next, exclude the UCP profile and API paths from page caching. Dynamic checkout responses must never show another shopper’s cart, address, price, or order information.
You may need to allow the route in Cloudflare, your hosting firewall, or your WordPress security plugin.
Step 9: Connect the WooCommerce Checkout Flow
A production UCP integration must connect the protocol’s checkout actions to WooCommerce.
Google’s native integration uses these three core endpoints:
POST /checkout-sessionsPUT /checkout-sessions/{id}POST /checkout-sessions/{id}/complete
The first endpoint creates a session. It receives product IDs and quantities, then returns prices, taxes, shipping options, payment capabilities, and legal links.
The second endpoint updates the session. It must recalculate totals when the buyer changes an address, shipping method, discount, or other checkout detail.
The final endpoint completes the purchase. It validates the payment, creates the WooCommerce order, reduces stock, and returns the completed order details.
Your API should never trust a price sent by an agent. It must calculate the current price from WooCommerce.
Step 10: Configure Google Pay and Payment Processing
UCP does not replace your payment gateway. It passes payment information to your existing payment system through an approved payment handler.
For Google’s native checkout path, businesses can use the Google Pay payment handler. Your existing Google Pay merchant ID and payment service provider relationship may support the UCP flow.
Test payments in a sandbox environment first. Confirm that:
- Payment tokens are processed only once.
- Failed payments do not create paid orders.
- Successful payments create one order.
- Taxes and shipping totals match WooCommerce.
- Refunds return through the correct gateway.
- Sensitive card details never enter WordPress logs.
- Duplicate API requests do not create duplicate orders.
Your payment processor may require extra approval before it accepts transactions from a new checkout surface.
Step 11: Choose Guest or Account-Linked Checkout
Guest checkout is the simpler option. It lets a buyer place an order without linking a store account.
Account-linked checkout uses OAuth 2.0. This can let shoppers use stored addresses, membership prices, loyalty benefits, or free-shipping rules.
Use account linking only when your integration can protect customer data correctly. Tokens should expire, rotate, and support revocation.
The agent should receive only the data needed for the requested task. It should not gain broad access to WordPress or WooCommerce administration.
Step 12: Sync Order and Fulfillment Updates
The process does not end after payment.
Your store must report later order events, such as:
- Order confirmed
- Processing started
- Item shipped
- Tracking number added
- Delivery completed
- Order cancelled
- Refund issued
- Item returned
Connect these events to WooCommerce order-status changes. Make sure updates use the correct order ID and cannot be sent for another customer’s order.
Signed webhooks can help the receiving system confirm that an update came from your store.
Step 13: Test the Complete UCP Journey
Test more than a simple product purchase.
Your test plan should include:
- A normal in-stock product
- An out-of-stock product
- A variable product
- Two different products in one cart
- A coupon code
- Free shipping
- Paid shipping
- An invalid address
- A tax-exempt product
- A failed payment
- A repeated payment request
- An order cancellation
- A partial refund
- A full refund
Check the WooCommerce dashboard after each test. Product stock, payment status, taxes, shipping, emails, and order notes should all match the API response.
Step 14: Protect the UCP API
A public profile does not mean every checkout action should be public.
Use strong controls for all private operations:
- HTTPS on every endpoint
- Bearer-token authentication
- Strict permission checks
- Input validation
- Request-size limits
- Rate limiting
- Signed webhook verification
- Secure secret storage
- Idempotency protection
- Error logging without personal data
Do not place API secrets inside public JavaScript, HTML source, a UCP profile, or a Git repository.
Create separate keys for development, staging, and production. Revoke unused keys at once.
Step 15: Apply for Google UCP Access
A working WordPress plugin does not automatically place your products inside Google’s direct checkout experience.
Google requires businesses to join its UCP waitlist and receive approval before going live in AI Mode in Google Search or Gemini.
Before applying, confirm that:
- Merchant Center is in good standing.
- Product listings are approved.
- Return and support information is complete.
- The public UCP profile works.
- Checkout endpoints pass your tests.
- Google Pay is configured.
- Order updates work.
- Your privacy and terms pages are live.
- Your store meets Google’s technical targets.
Google may also request technical testing before enabling production traffic.
Common UCP Setup Mistakes
Treating Plugin Activation as the Final Step
A plugin can create routes and profiles. However, it cannot guarantee product approval, Google access, correct payments, or reliable fulfillment.
Exposing WooCommerce Administrator Keys
UCP checkout endpoints should use the minimum permissions needed. Never give an external agent unrestricted administrator access.
Using Different Product IDs
A product-feed ID that does not match the checkout API can cause the wrong item to appear or fail during checkout.
Caching Checkout Responses
Checkout data changes by customer, location, stock, shipping method, and discount. Cached responses can expose private data or return incorrect totals.
Ignoring Variable Products
Size, color, material, and bundle choices must map to exact purchasable variations. An agent should never guess a variation.
Skipping Duplicate-Order Protection
Networks may retry failed requests. Your completion endpoint must recognize a repeated request and avoid charging the shopper twice.
UCP, MCP, and WooCommerce REST API Differences
These technologies work together, but they do different jobs.
| Technology | Main purpose |
|---|---|
| UCP | Defines product, cart, checkout, payment, and order interactions |
| MCP | Lets AI systems discover and call tools |
| WooCommerce REST API | Reads and changes WooCommerce store data |
| Google Merchant Center | Supplies approved product and business data to Google |
UCP may work over REST, MCP, Agent2Agent, or an embedded browser flow. Therefore, adding WooCommerce MCP support does not automatically create a complete UCP checkout integration.
How to Maintain the Integration
UCP is still evolving. Review the official specification and Google implementation guide before every major update.
Create a monthly maintenance process that checks:
- UCP profile validity
- Supported specification version
- Product-feed errors
- API response times
- Checkout failure rate
- Duplicate requests
- Payment errors
- Webhook delivery
- Plugin updates
- Security logs
Test again after updating WordPress, WooCommerce, payment extensions, tax tools, shipping tools, caching systems, or your UCP plugin.
Did You Know?
Google’s published UCP checkout targets require at least 95% endpoint availability. Its slowest listed 95th-percentile target is ten seconds for completing a checkout session. This means server speed and API reliability are important parts of UCP readiness.
Conclusion
The safest way to set up Universal Commerce Protocol on WordPress is to treat it as a full commerce integration, not a simple plugin switch.
Start with a stable WooCommerce store. Prepare accurate product data, connect Google Merchant Center, publish the public UCP profile, secure the checkout API, test payments, and sync order updates. Finally, apply for Google approval before expecting direct checkout in Search or Gemini.
Universal Commerce Protocol on WordPress is still early. A careful staging process and regular technical reviews will reduce payment, security, and customer-service risks.
FAQs
Can I use Universal Commerce Protocol without WooCommerce?
A basic WordPress website does not include products, carts, payments, or orders. You need WooCommerce or another commerce backend. Most available WordPress UCP plugins depend on WooCommerce because it supplies the product, checkout, payment, inventory, and order systems required by the protocol.
Is installing a UCP plugin enough to appear in Gemini?
No. A plugin may publish your UCP profile and create API endpoints, but Google has separate requirements. You need an approved Merchant Center account, eligible product listings, a tested checkout integration, supported payments, complete policies, and Google approval before direct buying can go live.
Is UCP the same as MCP?
No. UCP defines how agents handle commerce tasks such as products, carts, checkout, payments, and orders. MCP is a general method for letting AI systems discover and call tools. A UCP service may use MCP as a transport, but the two standards serve different purposes.
Does UCP replace my WooCommerce payment gateway?
No. UCP connects an AI shopping experience to your checkout process. Your payment gateway or payment service provider still authorizes and processes the transaction. You must confirm that your gateway supports the payment handler and token format used by your chosen UCP integration.
Is Universal Commerce Protocol safe for WordPress?
UCP can be implemented safely, but the setup needs strong controls. Use HTTPS, limited API permissions, signed webhooks, input validation, rate limits, secure secret storage, and duplicate-order protection. Test the integration on staging and review every third-party plugin or hosted service before sharing store credentials.
References
- https://blog.google/products/ads-commerce/agentic-commerce-ai-tools-protocol-retailers-platforms/
- https://ucp.dev/specification/overview
- https://developers.google.com/merchant/ucp/guides
- https://developers.google.com/merchant/ucp/guides/merchant-center
- https://developers.google.com/merchant/ucp/guides/ucp-profile
- https://developers.google.com/merchant/ucp/guides/checkout/native
- https://developers.google.com/merchant/ucp/faq
- https://developers.google.com/pay/api/universal-commerce-protocol/google-pay-payment-handler
- https://wordpress.org/plugins/universal-commerce-protocol-ucp-for-woocommerce/
- https://woocommerce.com/document/google-for-woocommerce/